Illustrated Anatomy of a Conn Valve, 1930s - 1940s
Part 2: Vertical Alignment
Introduction
In this article I will discuss way of evaluating and correcting the vertical alignment of Conn valves from
the 1930s and 1940s. This article deals specifically with Conn cornets and trumpets with serials starting with 3xx,xxx,
but should apply equally to other Conn instruments with serial numbers in that range. I haven't (yet?) had the
chance to study Conn valves from instruments with serials 2xx,xxx or 4xx,xxx so I don't know to what extent this
also applies to those instruments. If you haven't yet read part 1 of this article, I suggest you do so first.
Definitions
First let me describe exactly what I will be talking about here. On any instrument with valves, we want the holes in
the valve body to line up correctly with the valve ports (where the tubes connect to the valve casing) in both the
"up" and "down" positions of the valve. If this is not the case, then that will cause resistance not intended
by the instrument maker (this is undesirable).
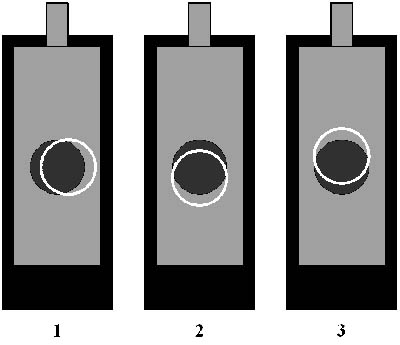
This alignment of the valves exists in rotation of the valve and in the vertical position of the valve. If the rotational alignment is off, the holes are off-center from side to side. If the vertical alignment is off, then the holes are off-center up and down. In the diagram below, the white ring indicates the valve port of the valve casing, the gray circle indicates the hole in the valve body. Valve number 1 shows rotational alignment being off. In valve number 2 the valve is too high, which means that the valve port is below the level of the hole in the valve. In valve number 3 the valve is too low: the valve port sits above the hole in the valve.
In my experience, the Conn valves we are discussing here rarely exhibit rotational alignment problems, but vertical alignment problems are quite common.
Checking vertical alignment
Vertical alignment can be off when the valve is either up, pressed down, or both. Before checking vertical alignment we need
to be sure that the valve is screwed together properly: top valve cap, finger button and valve stem screwed on all the way.
The (bottom) springs only come into play insofar that they must be strong enough to push the valve all the way. As long as
that is the case the springs are not important. The checking we are going to do will be against the corks and felts currently
installed on the valve.
Alignment in "valve pressed down" position
The easiest way to check the alignment of the valve when it is pressed down is to remove the second valve slide. Press down
the second valve and look into the slide. You should be able to see the valve through the second slide. When the valve pressed
down, you shouldn't see any part of the outside of the valve at all. If you see a small part of the outside of the valve along
the bottom of the valve port, the valve isn't going down far enough and it is "high when pressed down" (valve number 2 in the
diagram). If you see a small part
of the outside of the valve along the top of the valve port, the valve is going down too far and it is "low when pressed down"
(valve number 3 in the diagram).
It is impossible (very difficult unless you are lucky enough to have an endoscope) to check the "down" alignment of the number one and three valves, so the down vertical alignment of those valves must be judged from the relative height of the finger buttons compared to the finger button of the second valve, which is now known. A decent way to do this might be to make sure the groove around the bottom of the finger buttons lines up. Doing that might be easier than trying to see whether the top of the finger buttons is at the same height.
Alignment in "valve up" position
Checking vertical alignment in the "up" position is a normally more difficult. On instruments with the main tuning slide and the
third slide reversed such as the 80A Victor you might be able to look onto the third valve in the up position with the main tuning
slide removed. On instruments with the main tuning slide and the third slide in the "normal"position it is impossible short of
using an endoscope. However, the engineers at Conn have come to our aid. Remember the "Vertical Alignment Groove" on the valve stem
discussed in Part 1? If the vertical alignment in the "up" position of the valve is correct, that groove should be visible exactly at
the top of the top valve cap. If the groove is visible above the top of the valve cap, the valve is "high in the up position" (valve
number 2 in the diagram). If the groove is below the edge of the top valve cap, the valve is "low in the up position" (valve number
3 in the diagram).


Correcting vertical alignment
As we saw above, when the valve is pressed down it can be too high or too low.
Correcting alignment in the "valve pressed down" position
The alignment of the valve in the "pressed down" position is entirely related to
the felt under the finger button. If the valve is too high in the down position (valve number 2 in the diagram) then the
felt under the finger button is too thick. Replace it with a thinner felt.
If the valve is too low in the down position (valve number 3 in the diagram), then the felt under the finger button is too thin. Replace it with a thicker felt, or add another thin felt. This is the more likely scenario, with the valve being too low because the felt under the finger button has worn out.
Correcting alignment in the "valve up" position
This is a bit more tricky. First we need to be sure that the slotted corks are the right length. If the cork isn't the right length
this is usually due to the cork wearing down or having been improperly replaced. While it isn't necessary to have proper length corks to adjust
the valve height, it is preferable. See Part 1 under "slotted corks" for an explanation of how to cut replacement slotted corks.
If the valve is "high in the up position" (valve number 2 in the diagram) then the felt on top of the slotted cork is too thin (or the slotted cork is too short). Replace the felt with a thicker one, or add another thin felt. This is the most likely scenario due to the felt on top of the slotted cork wearing out and/or the cork wearing out.
If the valve is "low in the up position" (valve number 3 in the diagram) the felt on top of the slotted cork is too thick (or the slotted cork too long). Replace it with a thinner one.
See part 3, Illustrated Anatomy of a Conn Valve, 1930s - 1940s, Part 3: Sticking Valves, for a way to tackle sticking valves.